Tag Archives: nsz-101

First Time on the Front Line: A Rookie’s Guide to Reporting in Ukraine

PHOTOS + TEXT BY JAMES SPRANKLE FOR THE MEDILL NATIONAL SECURITY JOURNALISM INITIATIVE
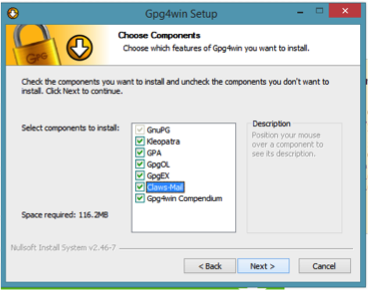
  • 12/25: A Ukrainian soldier at a checkpoint near Debaltseve. Note the tourniquet next to the radio. He is also wearing a plate carrier with no Kevlar.  (Photo Credit: James Sprankle)
    12/25: A Ukrainian soldier at a checkpoint near Debaltseve. Note the tourniquet next to the radio. He is also wearing a plate carrier with no Kevlar. (Photo Credit: James Sprankle)

KYIV, UKRAINE — For the last three months, I have been living in Ukraine and covering the war in Donbass as a photojournalist.

In 2014, after seven years in cable news in Washington, I decided to leave D.C. and start documenting the stories that I was interested in. So, I flew to Juba, South Sudan, with a writer buddy and spent the next two months working around the country. I was hooked.

Upon my return to the states, I got to work on planning a trip to Ukraine. I bought a new professional camera and body armor, and spent hours talking to friends and editors about how I was going to take this next step. I arrived in Kyiv on December 10. So far, my time in Ukraine has taught me a tremendous amount about … well, all sorts of things. It’s fair to say that I am a beginner in the conflict zone, but even though I’m new to this line of work, I think I’ve learned a few things that could prove valuable to others considering their first trip to a war zone.

PLANNING AHEAD

Before you decide to fly to a conflict zone, it is a good idea to familiarize yourself with where you are going. I started by creating Google News alerts for Ukraine, Russia, Donbass and Donetsk. I get them once a day around noon, but you can customize it to get them every five minutes if you are enthusiastic.

I also reached out to friends in the news business to see if they had any contacts in the region. Those contacts gave me guidance on who to follow on Twitter and what English-language local publications to read because I can’t speak Ukrainian or Russian.

Facebook is one of the best resources for a journalist new to an area. It seems that every country or region has a Facebook group for foreign journalists. Usually, in a private group, people post everything from carpool offers to fixer recommendations. Some are better than others. but Ukraine’s is very helpful.

Learning the history of an area is really important, as well. It makes things much clearer when you’re in the field because people love to explain why what’s happening now is because of something that happened 200 years ago.

WHEN YOU ARRIVE

It has been interesting to see the different types of journalists who come to Ukraine. Some will come for a few days or a few weeks, while the news is hot or if they are on an assignment. Others have apartments in Kyiv or near the front lines and have no idea when they will leave. I have actually met a few people who used to live in Moscow and, now that they’ve been in Kyiv since the 2013-2014 Euromaidan demonstrations (which ousted former President Viktor Yanukovych) have decided to make it their new base of operations.

I chose to rent a cheap apartment in Kyiv. It only costs about $10 to take the train from Kyiv to towns near the front. It can be hard to find places, but if you know anybody on the ground or are a member of a local journalist social networking group, you likely can get help.

WORKING IN THE WAR ZONE

Accreditation:

Before you cover anything, it is prudent to get all of the official media accreditation you can. To work in East Ukraine, which the government has labeled the ATO or Anti-Terrorist Operation zone, you need to first be accredited through the state security office, the SBU. After that, the government requires anyone going into the ATO to have an ATO card.

The same goes for the pro-Russian self-proclaimed People’s Republics of Donetsk (DNR) and Luhansk (LNR). They both require journalists to apply for press credentials before covering anything. I have yet to travel to Luhansk, but the DNR press office is located in the Regional Administration building in Donetsk city center. It’s a painless process that only takes about 15 minutes. When I was working in Donetsk in January of this year, I was stopped many times at checkpoints and would have been detained if I didn’t have my DPR press credentials.

Also keep in mind that they require a separate military press credential needed to cover any stories involving the military. Always check with the other journalists about which credentials are required for what.

Getting there:

I knew where I wanted to go, but didn’t know how to get there. My first trip to the ATO zone was a week after I arrived in Kyiv. A Ukrainian friend helped me get on a Ministry of Defense press trip to Debaltseve. Things were relatively calm at that point, and the military wanted to show off to the press how well it was maintaining a ceasefire. We traveled in armored personnel carriers and were only let out and allowed to photograph for about 30 minutes at a time. All in all, it was not a very enlightening trip, but it was a nice way to ease into it.

The second time was about a week later. I had met a British journalist who had been living in Kyiv and covering the political situation there since the Euromaidan demonstrations. We planned what were supposed to be a few day-long excursions that ended up being three weeks. Along with a Polish writer and a Ukrainian videographer, we made the 10-hour drive to the East. I would again be visiting the town of Debaltseve, but, this time, I could see everything and stop to photograph anything I’d wanted.

The last time I went out, I hitched a ride with Ukrainian volunteers who were distributing supplies and medical aid to military units all along the front line.

I now feel comfortable enough to travel on my own, but for the first few times, it was a good idea to convoy with others who were more familiar with the area. It also makes the travel cheaper.

Checkpoints:

Military and police checkpoints are a ubiquitous part of covering the conflict in Ukraine. They are usually made of concrete slabs and detritus, and manned by national border guards, the military or some iteration of police. The closer you drive = to the front lines, the more of them you’ll have to go through.

First off, they are usually nothing to worry about. Do you have your government accreditation? OK. Did you stash the opposing side’s credentials in your backpack? Cool, nothing to worry about. Your best tools for success are usually a good attitude and some cigarettes.. A little football talk in broken Russian doesn’t hurt either.

If you do get detained for some reason, don’t freak out. It’s really important to remain calm and not be combative. There are also ways you can gauge how much trouble you are in. If they let you use the toilet or offer you tea or cigarettes, I wouldn’t sweat it. There are a lot of eyes on Ukraine, and both sides consider receiving international attention for the torture or death of a foreign journalist as bad for the cause. But that’s not to say that it couldn’t happen.

Another useful thing to know about checkpoints is that they are targets. They do get shelled, and the closer they are to the front line, the more likely that is. Of course, the probability changes according to the ebb and flow of fighting, but this is something you need to keep in mind. Prepare yourself mentally for that possibility. I wear my body armor whenever I travel from one front line to the other.

Money:

There are banks everywhere, and most of those banks have ATMs. As long as you are on the Ukrainian side of the front lines, you should be able to withdraw money. Ukraine and the separatist regions are, for the most part, cash economies. You’ll be paying your fixers, drivers and roadside babushkas selling pastries in cash.

A few things to keep in mind about having enough cash: In Kyiv, this is no problem, but when you are outside of the big city ATMs will sometimes run out of cash over the weekend. Make sure you withdraw as much as you will need to get you through the weekend.

Watch the currency fluctuations! The value of the Hryvnia changes all the time. When I arrived in December, the exchange rate was about 15 Hryvnia to the dollar. At one point in February, it jumped up to about 35 to the dollar, and, now, it seems to have leveled off at around 25. Watching these rate changes can save you a considerable amount of money.

Some places you will travel to will not have a legitimate financial system. There are no working ATMs or banks in the Donetsk and Luhansk People’s Republics. Bringing in dollars or euros isn’t a bad idea because you will get the most bang for your buck.

Fixers and drivers:

Even a great journalist needs a fixer or driver sometimes. They are an indispensible asset on your quest for good stories and access. Fixers can be very expensive, but prices fluctuate according to demand, and you can always negotiate a rate. Drivers can be a bit cheaper and usually know all the back roads, as well as how to talk to checkpoint soldiers. Sometimes, you can use you driver as a fixer if the task is not too difficult. Again, one of the best resources for finding these people was using a journalist Facebook site.

When you’ve hired your fixer or driver, it is really important to consider his or her safety when going into a combat zone. Most do not own body armor, and their cars are their only source of income. It is important that you discuss exactly what you want to do and whether they are comfortable doing it. I have run across fixers and drivers who suddenly wanted to head back because they didn’t feel safe. These boundaries are usually determined ahead of time, but you need to respect their safety concerns and either go back or figure out another way to travel. In a way, they are your responsibility. On the other hand, I had a driver who weaved through land mines and dodged unexploded ordinance, all with a smile on his face.

PERSONAL SAFETY

Body Armor:

Purchasing body armor, also known as bulletproof vests and ballistic helmets, was one of the most important things I did before I left for Ukraine. They should be a requirement for any journalist wanting to work on the front lines. There are many different ways of obtaining armor. Sometimes, an employer will provide you with a set. There are also organizations that rent them out to journalists. I decided to purchase my own because I knew exactly what kind of set-up I wanted and that I would be using it for a long timeIt cost me around $800. If you decide to purchase some, I recommend that it not be camouflaged so that you won’t look like a fighter through a sniper’s scope.

Not all body armor is created equal. Some vests only contain a material called Kevlar, others are called plate carriers and some are plate carriers with Kevlar.

What does all this mean and what do they do?

A Kevlar vest is your typical bulletproof vest. It is tried and true, but only rated to stop less-powerful projectiles like pistol rounds and possibly shrapnel, flying bits of metal.

A plate carrier, which I wear, is a vest with a large pouch in the front and another in the back. In these pouches go either metal or composite plates that can be rated to stop more powerful projectiles like AK-47 rifle rounds or larger, faster shrapnel. The best thing to have for Ukraine – since most of the fighting involves things like mortars, artillery and rockets that produce these horrid little shards of shrapnel – is a combination vest with rifle plates on the front and back and Kevlar bits around the neck, groin and sides. It will better protect your heart from big stuff and the other important things from errant bits of flying metal. Don’t leave home without it.

Ballistic helmets are another must-have on any combat journalist’s list. Usually made of some kind of durable composite, they can protect your cranium from all kinds of nasty things. They normally cannot protect against a direct hit from heavy shrapnel or a rifle round, but they can save your life from indirect hits and smaller stuff. Slap a press sticker on it and you are set.

Medical Kits:

Another thing not to leave home without is a medical kit. This little bag, which you can usually fasten to your belt loop or backpack, should contain everything you need to treat a stomach ache or stabilize a gunshot wound. I pack antibiotics, alcohol and iodine wipes, gauze, compression bandages, stool softener, stool hardener and Celox blood coagulant.

A tourniquet is arguably the most important thing in your kit. It is intended stabilize arterial bleeding in a leg or arm by putting so much pressure on the area that blood is no longer able to flow to the wound – or anywhere else, for that matter. I carry two tourniquets. One is in my satchel bag and the other is velcroed to my body armor. It’s important that they are readily accessible and easy to detach. If you or someone with you is wounded in a leg or arm, you will need to apply pressure as soon as possible to prevent further blood loss.

I also carry a chemical blood-clotting compound called Celox. This product is touted as having the ability to clot arterial wounds and is used by militaries and medical professionals all over the world. The stuff is kind of like a glue, which you squirt into a wound with a syringe or pack as a gauze, that will clot any bleeding in the area. A New York Times medical liaison explained to me that a tourniquet cuts off all blood supply to the area, while Celox allows for blood in the undamaged veins and capillaries to keep flowing. What this means is that if you get hit, apply the Celox and stop the arterial bleeding, you might still have the ability to walk or run because the leg is receiving blood. As wonderful as this product is, it should not replace your tourniquet. Just get both.

Close to the Fight:

Journalists covering a war will more than occasionally find themselves in close proximity to explosions and gunfire. Most of my experience with combat centers around being close to mortars, artillery and rocket fire. Of course, I’m always wearing my armor. I also make a point to scope out the scene for any kind of fortification that could protect against shrapnel during a strike. But there’s really not much you can do other than get flat and take cover behind something hard.

Knowing the battle space:

I believe that it’s very important to learn as much as possible about the different weapons systems being used in a particular theatre of war. Not only will that knowledge help you write more accurate news pieces and captions, but weapons can tell a person a lot about battlefield dynamics.

For instance, some weapons, like the T-72b3, have never been operated by the Armed Forces of Ukraine. Learning the identifying features of this vehicle and how those features differ from a regular T-72 (which is operated by both sides) can tell a person that there is Russian Federation military equipment in Donbass (H/T Bellingcat).

Knowing the kinds of mortars, rockets systems and artillery pieces being used and a little about blast patterns can give you an idea about from where an attack may have been launched.

Each little bit of information can help a journalist make more sense of the fog of war. I suggest sites like armamentresearch.com and Bellingcat.com. Additionally, if you can get yours hands on a Jane’s Ammunition Handbook or Armour and Artillery, those are wonderfully detailed references.

Similar to many conflicts, Ukraine has its fair share of semi-autonomous volunteer paramilitary groups and militias. On the Ukrainian side, some of the armed groups like the far-right Right Sector were mobilized in the East after taking part in the street fighting of the Euromaidan demonstrations. Similar types of groups exist on the pro-Russian side, as well. Learning about who’s who and their back story can tell a journalist about what certain folks are fighting for and what or who motivates them.

Official Information:

I think the hardest thing for a journalist to deal with in Ukraine is the unreliability of information from government sources. It’s almost impossible to trust the “official” facts and figures about a particular news event. An article by Oliver Carroll writing for The Independent describes this situation perfectly. In January, mortar or artillery rounds landed near a bus stop in the Leninsky Raion (district) of Donetsk city. Donetsk People’s Republic authorities on the ground blamed the attack on pro-Ukraine partisans operating within the city. They never provided any evidence. Later, the head of the self-proclaimed Donetsk People’s Republic stated that there had been an artillery strike. But this was contradicted by an American military analyst cited by Carroll who said the blast craters were most likely associated with 120mm mortar bombs. In the end the only thing journalists could be sure of was that civilians had been killed and many of the citizens of Donetsk were furious with the Ukraine government.

Another example is the ongoing propaganda circus surrounding the July 17, 2014, shooting down of Malaysian Airlines flight 17 over east Ukraine. Russia and pro-Russian separatists have blamed the Ukrainian government, while most of the international community has assigned blame to a Russian BUK anti-aircraft missile system operating in separatist held territory. Bellingcat.com has worked to decipher the conspiracy theories and fabricated claims by providing in-depth analysis of open sourced information from places like Facebook, Twitter and VKontakte (Russian Facebook) and cross-checking them using satellite imagery.

For more on James Sprankle, visit his website or follow him on Instagram, Facebook and Twitter.

A How-to Guide for Encrypting and Protecting Digital Communications using PGP

BY AARON RINEHART FOR THE MEDILL NSJI

“Encryption works. Properly implemented strong crypto systems are one of the few things that you can rely on. Unfortunately, endpoint security is so terrifically weak that NSA can frequently find ways around it.”

— Edward Snowden, answering questions live on the Guardian’s website

From surveillance to self-censorship, journalists are being subjected to increased threats from foreign governments, intelligence agencies, hacktivists and other actors who seek to limit or otherwise manipulate the information they possess. The notorious Edward Snowden stressed to the New York Times in an encrypted interview the importance of encryption for journalists: “It should be clear that [for an] unencrypted journalist to source communication is unforgivably reckless.” If journalists are communicating insecurely and without encryption, they put themselves, their sources and their reporting at unnecessary levels of risk. This sort of risky behavior may send the wrong message to potential key sources, like it almost did when Glenn Greenwald almost missed out on the landmark story of National Security Agency surveillance set out in the Snowden documents because he wasn’t communicating via encryption.

The aim of this how-to guide is to provide a clear path forward for journalists to protect the privacy of their reporting and the safety of their sources by employing secure communication methodologies that are proven to deliver.

How and When Should I Encrypt?

Understanding the basics of encryption and applying these tools and techniques to a journalist’s reporting is rapidly becoming the new normal when conducting investigative research and communicating with sources. It is, therefore, just as vital to know when and how to encrypt sensitive data as it is to understand the tools needed to do it.

In terms of when to encrypt, confidential information should be both encrypted “At-Rest” and “In-Transit” (or “In-Motion”). The term data-at-rest refers to data that is stored in a restful state on storage media. An example of this is when a file is located in a folder on a computer’s desktop or an email sitting in a user’s in-box. The term data-in-transit describes the change of data from being in a restful state to being in motion. An example of data-in-transit is when a file is being sent in an email or to a file server. With data-in-transit, the method of how the data is being transmitted from sender to receiver is the primary focus — not just the message. This is illustrated more effectively in the example of using a public wireless network in that if the network is not setup to use strong encryption to secure your connection, it may be possible for someone to intercept your communications. The use of encryption in this use case demonstrates how sensitive data, when not encrypted while in transit, can be compromised.

Methods for protecting Data-at-Rest and Data-in-Transit

Data-at-Rest can be protected through the following methods.

One suggested methodology is to encrypt the entire contents of the storage media, such as a hard drive on a computer or an external drive containing sensitive material. This method provides a higher level of security and can be advantageous in the event of a loss or theft of the storage media.

A second method – which should be ideally combined with the first method – is to encrypt the files, folders and email containing sensitive data using Pretty Good Privacy (or PGP) encryption. PGP encryption also has the added benefit of protecting data-in-transit, since the data stays encrypted while in motion

The name itself doesn’t inspire much confidence, but PGP or “Pretty Good Privacy” encryption has held strong as the preferred method by which individuals can communicate securely and encrypt files.

The concepts surrounding PGP and getting it operational can often seem complex, but this guide aims to make the process of getting started and using PGP clearer.

PGP Essentials: The Basics of Public and Private Keys

Before diving too deeply into the software setup needed to use PGP, it is important to understand a few key fundamentals of how PGP encryption works.

Within PGP and most public-key cryptography, each user has two keys that form something called a keypair. The reason the two keys are referred to as a keypair is that the two are mathematically linked.

The two keys used by PGP are referred to as a private key, which must always be kept secret, and a public key, which is available for distribution to people with whom the user chooses to communicate. Private keys are predominantly used in terms of email communications to decrypt emails from a sender. Public keys are designed for others to use to encrypt mail to the user.

In order to send someone an encrypted email, the sender must first have that recipient’s public key and have established a trusted relationship. Most encryption systems in terms of digital communications are based on establishing a system of trust between communicating parties. In terms of PGP, exchanging public keys is the first step in that process.

Key Management: Best Practices

Regardless of whether the user is using the OpenPGP standard with GNU Privacy Guard (GPG) or another derivative, there are a few useful points to consider in terms of encryption key management.

Private Keys are Private!

The most important concept to remember is that private Keys should be kept private. If someone compromises the user’s private key, all communications would be trivial to intercept.

Generating Strong Encryption Keys

When generating strong private/public keypairs there are some important things to remember:

  • Utilize Large Key Sizes and Strong Hashing Algorithms

It is recommended that when generating a keypair to make the key size at least 4096bit RSA with the SHA512 hashing algorithm. The encryption key is one of the most important pieces in terms of how the encryption operations are executed. The key is provided to present a unique “secret” input that becomes the basis for the mathematical operations executed by the encryption algorithm. A larger key size increases the strength of the cryptographic operations as it complicates the math due to the larger input value. Thus, it makes the encryption more difficult to break.

  • Set Encryption Key Expiration Dates

Choose an expiration date less than two years in the future.

  • Strong Passphrase

From a security perspective, the passphrase is usually the most vulnerable part of the encryption procedure. It is highly recommended that the user choose a strong passphrase.

In general terms, the goal should be to create a passphrase that is easy to remember and to type when needed, but very hard for someone else to guess.

A well-known method for creating strong, but easy to remember, passwords is referred to as ‘diceware,’. Diceware is a method for creating passphrases, passwords and other cryptographic variables using an ordinary die from a pair of dice as a random number generator. The random numbers generated from rolling dice are used to select words at random from a special list called the Diceware Word List. The recommendation when using diceware to create a PGP passphrase is to use a minimum of six words in your passphrase. An alternative method for creating and storing strong passphrases is to use a secure password manager such as KeePass.

Backing Up Private Keys

Although a journalist may be practicing good security by encrypting sensitive information, it would be devastating if a disruptive event – such as a computer hardware failure – caused them to lose their private key, as it would be near-impossible to decrypt without it. When backing up a private key, it is important to remember that is should only be stored on a trusted media, database or storage drive that is preferably encrypted.

Public Key Servers

There are several PGP Public Key servers that are available on the web. It is recommended for journalists upload a copy of their public keys to public key servers like hkp://pgp.met.edu to open their reporting up to potential sources who wish to communicate securely. By uploading a copy of the public key to the key server, anyone who wants to communicate can search by name, alias or email address to find the public key of the person their looking for and import it.

Validating Public Keys: Fingerprints

When a public key is received over an untrusted channel like the Internet, it is important to authenticate the public key using the key’s fingerprint. The fingerprint of an encryption key is a unique sequence of letters and numbers used to identify the key. Just like the fingerprints of two different people, the fingerprints of two different keys can never be identical. The fingerprint is the preferred method to identify a public key. When validating a public key using its fingerprint, it is important to validate the fingerprint over an alternative trusted channel.

For example, if a journalist receives a public key for a source on a public key server, it is important for them to validate the key by either communicating in person, calling them over secure phone or via an alternate communication channel. The purpose of key validation is to guarantee that the person being communicated with is the key’s true owner.

Adding PGP Public Key Fingerprint to Twitter

For journalists, its important to ensure sources can quickly validate their public keys that they retrieve from Public Key servers. A common method to convey a PGP public key to the public is to tweet the public key fingerprint and link to that tweet in to the bio.

Another method is to link directly to the PGP key on a public keyserver (like MIT’s) and to provide a copy of the key fingerprint in the bio, like this example with Barton Gellman.

1

GNU Privacy Guard: Encrypting Email with GPG

Hold up, stop and wait a minute: I thought the topic of discussion was PGP.

Is GPG a typo?

No. In fact, GPG (or the GNU Privacy Guard) is the GPL-licensed alternative to the PGP suite of encryption software. Both GPG and PGP utilize the same OpenPGP standard and are fully compatible with one another.

Getting Started with GPG: From Setup to Secure

A Step-by-Step Guide to Setting up GPGTools on Apple OSX

Tutorial Objectives

  • How to install and configure PGP on OS X
  • How to use PGP operationally

Install the GPGTools GPG Suite for OS X

This step is simple. Visit the GPGTools website and download the GPG Suite for OS X. Once downloaded, mount the DMG and run the “Install.”

2

Select all modules and, then, press “Install.”

3

Generating a New PGP key

When the installer completes, a new app called “GPG Keychain Access” will launch. A small window will pop up immediately and say: “GPG Keychain Access would like to access your contacts.” Press “OK.”

4

After pressing “OK,” a second window will pop up that says “Generate a new keypair.” Type in your name and your email address. Also, check the box that says “Upload public key after generation.” The window should look like this:

5

Expand the “Advanced options” section. Increase the key length to 4096 for extra security. Reduce the “Expiration date” to 1 year from today. The window should look like this:

6

Press “Generate key.”

After pressing “Generate key,” the “Enter passphrase” window will pop up.

Okay, now this is important

The Importance of Good Passphrases

The entire PGP encryption process will rest on the passphrase that is chosen.

First and foremost: Don’t use a passphrase that other people know! Pick something only you will know and others can’t guess. Once you have a passphrase selected, don’t give it to other people.

Second, do not use a password, but rather a passphrase — a sentence. For example, “ILoveNorthwesternU!” is less preferable than “I graduated from Northwestern U in 1997 and it’s the Greatest U on Earth?!” The longer your passphrase, the more secure your key.

Lastly, make sure your passphrase is something you can remember. Since it is long, there is a chance that you might forget it. Don’t. The consequences to that will be dire. Make sure you can remember your passphrase. In general there are several methodologies by which you can employ to store your passphrase to ensure its safekeeping. One such method would be to make use of a password manager like “KeePass”, an open source encrypted password database that securely stores your passwords.

Once you decide on your passphrase, type it in the “Enter passphrase” window. Turn on the “Show typing” option, so you can be 100% sure that you’ve typed in your passphrase without any spelling errors. When everything looks good, press “OK:”

7

You will be asked to reenter the passphrase. Do it and press “OK:”

8

You will then see a message saying, “We need to generate a lot of random bytes…” Wait for it to complete:

9

Your PGP key is ready to use:

PGPkeyready

Setup PGP Quick Access Shortcuts

Open System Preferences, select the “Keyboard” pane and go to the “Shortcuts” tab.

On the left hand side, select “Services.” Then, on the right, scroll down to the subsection “Text” and look for a bunch of entries that start with “OpenPGP:”

Go through each OpenPGP entry and check each one.

10

Bravo! You’re now done setting up PGP with OpenGPG on OS X!

Now, let’s discuss how to use it.

How to send a secure email

To secure an email in PGP, you will sign and encrypt the body of the message. You can just sign or just encrypt, but combining both operations will result in optimum security.

Conversely, when you receive a PGP-secured email, you will decrypt and verify it. This is the “opposite” of signing and encrypting.

Start off by writing an email:

  1. Select the entire body of the email and “Right Click and Go to Services -> OpenPGP: Sign” to sign it.
  1. Open the GPG Keychain Access app. Select “Lookup Key” and type in the email address of the person you are sending your message to. This will search the public keyserver for your source’s PGP key.

If your source has more than one key, select his most recent one.

You will receive a confirmation that your source’s key was successfully downloaded. You can press “Close.”

You will now see your source’s public key in your keychain.

  1. You can now quit GPG Keychain Access and return to writing the email.
  1. Select the entire body of the email (everything, not just the part you wrote) and “Right Click and Go to Services -> OpenPGP: Encrypt” to encrypt it. A window will pop up, asking you who the recipient is. Select the source’s public key you just downloaded and press “OK.”
  1. Your entire message is now encrypted! You can press “Send” safely.

As a reminder, you will only need to download your source’s public key once. After that, it will always be available in your keychain until the key expires.

How to receive a secure email

With our secure message sent, the recipient will now want to decipher it. For the sake of this step, I will pretend that I am the recipient.

I have received the message:

email

  1. Copy the entire body, from, and including, “—–BEGIN PGP MESSAGE—“, to, and including, “—–END PGP MESSAGE—“. Open a favorite text editor, and paste it:

email2

  1. Select the entire text, “Right click and select Services – OpenPGP – Decrypt” – to decrypt the message. You will immediately be prompted for your PGP passphrase. Type it in and press “OK:”

email3

  1. You will now see the decrypted message!

email4Next, you can verify the signature.

  1. Highlight the entire text and “Right Click and Go to Services -> OpenPGP: Verify”. You will see a message confirming the verification.
  2. Press “OK.”

Setting up GPG4Win on Windows

Tutorial Objectives

  • How to install and configure PGP on a PC
  • How to use PGP operationally

Installing the GPG4Win GPG Suite

This step is simple.

  1. Visit the GPG4win website and download the GPG Suite for OS X.
  2. Once downloaded, run the “Install”.

GPG1

Download Install File

GPG2

  1. Double-Click on the downloaded file to begin the installation wizard.
  2. Select the components to install, but keep it simple by installing all components except for Claws Mail.
  3. Select “Next”

A brief description of each component:

gpg3

  • Kleopatra – a certificate manager
  • GPA – another certificate manger
  • GpgOL  – a plugin for Outlook
  • GPGEX – an extension for Windows Explorer
  • Claw-Mail – a lightweight email program with GnuPG support built-in
  • Gpg4win Compendium  – a manual
  1. Select desired preferences and click “Nextgpg5

5. Click “Finish” to exit the install wizard.

Setting up GPG4Win using Thunderbird and Enigmail

Enigmail, a play on words originating from the Enigma machine used to encrypt secret messages during World War I, is a security extension or add-on to the Mozilla Thunderbird Email software. It enables you to write and receive email messages signed and/or encrypted with the OpenPGP standard. Enigmail provides a more simplified method for sending and receiving encrypted email communications. This step-by-step guide will help you get started installing and configuring the extension.

  1. Open Thunderbird and navigate to the Add-Ons Manager under the “Tools” menu.
  2. In the search dialog box, type “Enigmail.”Now, a list of Add-Ons will be available.
  3. Select the Enigmail add-on from the list.
  4. Click the “Install” button.

ENIG1


  1. There should now be a message indicating, “Enigmail will be installed after you restart Thunderbird.” Proceed with the installation by Clicking on the words “Restart Now

ENIG2


  1. After the Thunderbird application restarts, Enigmail should look like the image below. Proceed with configuring the add-on by Selecting Enigmail from the list.

ENIG3

  1. Select “I prefer a standard configuration (recommended for beginners)” and click “Next”.

Generating a Public/Private Keypair.

  1. Select the Account to generate the keys for.
  2. Enter in a strong passphrase
    • If the passphrase isn’t strong enough, the Passphrase quality meter will indicate that with a red- or yellow-colored bar (vs. the green one shown in the image below).
  3. Re-enter the strong passphrase to confirm.

keypair1


The Key Generation Process will generate a series of data based on random activity and assign it to the randomness pool for which to generate the keypair.

keypair2


  1. Save the revocation key to a trusted and safe, separate device (storage media)!

The revocation certificate can be used to invalidate a public key in the event of a loss of a secret (private) key.

keypair3


Key Management / View Key in Enigmail

management1

  1. Change the expiration date (suggested <2 years)

management2


  1. Upload Key To Public Keyserver (like hkp://pgp.mit.edu).

Public Keyserver Lookup

Look up the Public Keys of other people on public keyserver directly from within Enigmail.

  1. Select “Search for Keys” from the “Keyserver” dropdown menu.
  2. Enter in the Email Address or <FirstName><space><LastName> of the persons name that is being looked up.

A good test for this function is to try searching for Glenn Greenwald.

management3


Notice how many active public keys Glenn Greenwald has. This could be intentional, but it can also happen when setting up keys on a new device or email client and 1. Forgot the private key passphrase 2. Lost the key revocation file or forgotten the passphrase to unlock it.

The problem is that anyone contacting the user for the first time will have to figure out which key is the correct one to use. It also becomes a security risk because any one of those unused, but active, keys could be compromised, and result in adversaries accessing communications.

MORAL Of THE STORY: Set an expiration date, manage the revocation key file and manage passphrases.

Revoking a Key

  1. Right-click on the key and click on Key Properties.

revoke1


  1. At the bottom of the window Click on the ”Select Action” dropdown menu and Select “Revoke Key.”

revoke2

  1. A dialog box will pop up asking for the Private Key’s unique passphrase. Enter the passphrase for the key that is being revoked.

revoke3

  1. Once completed, the user will receive an ‘Enigmail Alert’ indicating that the key has been revoked. The alert warns the user that ‘if your key is available on a keyserver, it is recommended to re-upload it, so that others can see the revocation’. It is important to update the public keyservers to ensure that sources are aware of revoked keys and new keys on each account.

revoke4


Operationalizing GPG: A Pragmatic Approach

What do encrypt, decrypt, sign, and verify mean?

  • Encrypt takes the user’s secret key and the recipient’s public key, and jumbles a message. The jumbled text is secure from prying eyes. The sender always encrypts.
  • Decrypt takes an encrypted message, combined with the user’s secret key and the sender’s public key, and descrambles it. The recipient always decrypts. Encrypt and decrypt can be thought of as opposites.
  • Signing a message lets the receiver know that the user (the person with the user’s email address and public key) actually authored the message. Signing also provides additional cryptographic integrity by ensuring that no one has interfered with the encryption. The sender always signs a message.
  • Verifying a message is the process of analyzing a signed message to determine if the signature is true. Signing and verifying can be thought of as opposites.

When should someone sign a message? When should they encrypt?

If it is unnecessary to sign and encrypt every outgoing email, when should the user sign? And when should the user encrypt? And when should the user do nothing?

There are three sensible choices when sending a message:

  • Do nothing. If the contents of the email are public (non-confidential), and the recipient does not care whether the user or an impostor sent the message, then do nothing. The user can send the message as they’ve sent messages their entire life: in plain text.
  • Sign, but don’t encrypt. If the contents of the email are public (non-confidential), but the recipient wants assurance that the suspected sender (and not an impostor) actually sent the message, then the user should sign but not encrypt. Simply follow the tutorial above, skipping over the encryption and decryption steps.
  • Sign and encrypt. If the contents of the email are confidential, sign and encrypt. It does not matter whether the recipient wants assurance that the user sent the message; always sign when encrypting.

For a majority of emails that the user may send, encryption is just not always necessary. The remainder of the time, the user should sign and encrypt.

Whenever there is confidential information — such as sensitive reporting information, source address and name information, credit card numbers, bank numbers, social security numbers, corporate strategies or intellectual property — users should sign and encrypt. In terms of confidential information, users should err on the side of caution and sign and encrypt gratuitously rather than doing nothing and leaking sensitive information. As for the third option, users can sign, but do not encrypt.

Best Practices in Information Security

Despite best practices regarding the operational usage of PGP encryption, a disregard for the fundamentals of information security can still put a journalist’s communications in peril. It doesn’t matter how strong the encryption is if the user’s laptop has already been compromised, and is only a matter of time before the journalists’ encrypted communication method is in jeopardy.

Below is a short list of some high-level information security best practices. For more information on this subject, see Medill’s National Security Zone Digital Security Basics for Journalists.

  • Good password management

Journalists should not only create strong passwords, but also avoid using the same password for anything else. Consider using a password manager.

  • Keep software up to date.

Update software frequently. This helps thwart a majority of attacks to your system.

  • End-Point Security Software

Make use of antivirus and anti-malware software.

  • Be wary of odd emails and accompanying attachments.

When in doubt, don’t click. The goal of most phishing attacks is to either get you to download a file or send you to a malicious website to steal your username and password. If it doesn’t seem right or doesn’t make sense, try reaching out to the person via an alternate communication method before clicking.

  • Stay away from pirated software.

Nothing is truly free, as these software packages can often come with unintended consequences and malicious code packaged with them.

GPG Alternatives

  • CounterMail: a secure online email service utilizing PGP without the complexity of complicated key management.
  • DIMEDark Internet Mail Environment: a new approach and potential game-changer to secure and private email communications.

Additional Resources

Glossary of Terms

Keyword Definition
Ciphertext Ciphertext is encrypted text. Plaintext is what you have before encryption, and ciphertext is the encrypted result. The term cipher is sometimes used as a synonym for ciphertext, but it more properly means the method of encryption rather than the result.
Data-at-Rest Data at rest is a term that is sometimes used to refer to all data in computer storage while excluding data that is traversing a network or temporarily residing in computer memory to be read or updated.
Data-In-Transit Data in Transit is defined as data no longer at a restful state in storage and in motion.
Digital Signature A digital signature is a mathematical technique used to validate the authenticity and integrity of a message, software, or digital document.
Encryption Encryption is the conversion of electronic data into another form, called ciphertext, which cannot be easily understood by anyone except authorized parties.
Fingerprint In public-key cryptography, a public key fingerprint is a short sequence of bytes used to authenticate or look up a longer public key. Fingerprints are created by applying a cryptographic hash function to a public key.
Key In cryptography, a key is a variable value that is applied using an algorithm to a string or block of unencrypted text to produce encrypted text, or to decrypt encrypted text.
Password Manager A password manager is a software application that helps a user store and organize passwords. Password managers usually store passwords encrypted, requiring the user to create a master password; a single, ideally very strong password which grants the user access to their entire password database.
Private Key In cryptography, a private or secret key is an encryption/decryption key known only to the party or parties that exchange secret messages. In traditional secret key cryptography, a key would be shared by the communicators so that each could encrypt and decrypt messages. The risk in this system is that if either party loses the key or it is stolen, the system is broken. A more recent alternative is to use a combination of public and private keys. In this system, a public key is used together with a private key.
Public Key In cryptography, a public key is a value provided by some designated authority as an encryption key that, combined with a private key derived from the public key, can be used to effectively encrypt messages and digital signatures.

Term Definitions provided by TechTarget.com, Webopedia.com, and Wikipedia.org